Description
Staff Favourite
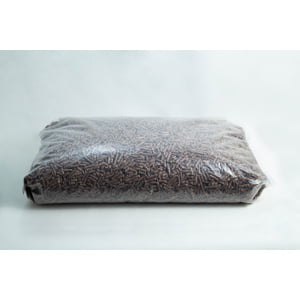
About this 3kg Kit
Complete Kit: Everything you need is included, just spray water and follow the simple instructions.
This kit uses a special Master’s Mix, a blend of sawdust, soy pellets, and water. It’s inoculated with about 300 grams of rye or millet grain spawn to give your mushrooms the best start.
We keep things simple and affordable by sending you a fresh, made-to-order bag, just like real mushroom farms use. No fancy boxes, no sitting in cold storage for weeks. This helps keep your cost down by $10; we pass that saving directly to you. We call these kits ‘almost ready to fruit’.
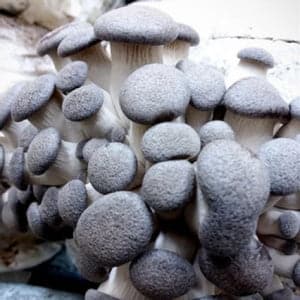
Snow White Oysters are celebrated for their pristine white caps, mild-sweet flavor, and firm texture. Most kits produce large, elegant clusters within 1–2 weeks and can yield 1 to 2 lb of mushrooms per block. They’re perfect for beginners and flourish in cooler, consistent conditions.
Humidity: Keep above 85% RH—mist 2–3 times daily.
Light: Provide indirect light to support healthy cap development.
Air: Ensure good fresh air exchange to prevent CO₂ buildup.
Snow White Oyster Grow Kit – Elegant & Consistent
The Snow White Oyster delivers flawless, bright-white clusters that are not only beautiful but incredibly versatile in the kitchen. Fruiting rapidly (1–2 weeks to first harvest), these mushrooms offer a delicate flavor and firm texture that stands up beautifully in soups, pastas, and on their own.
Step-by-step Instructions & Post-Harvest Care
IMPORTANT— Snow Whites prefer cool conditions—ensure your setup stays within 10–18 °C for best results.
Step 1 – Let It Grow
*Take the bag out of its packaging.
*Stand it upright letting the mycelium breath from the white filter and do not cut it yet.
*Please keep it away from direct sunlight, windows, fans, AC, or a wardrobe.
Note: Full colonisation for Snow white oyster blocks can take about 2 weeks depending on temperature ,wait until the block is solid white before inducing fruiting.
Need to Wait?
If you’re not ready to start fruiting after full colonisation, you can store the bag in the fridge for up to a month . Do not store it in the fridge until the bag is fully colonised(white).
Step 2 – Fruiting & Harvest
Once colonised, begin fruiting:
1. Cut: To prepare your side-fruiting mushroom growing kit, start by cutting a 10–12 cm “X” into the plastic on the side of the block, where the substrate touches the bag. This is where the mushrooms will fruit from. After making the cut, gently press out any trapped air inside the bag. Then, take the loose, empty upper portion of the bag (since the block only fills the lower half) and fold or roll it neatly over the top of the block. Secure it in place with tape so it doesn’t hang down or cover the fruiting area. This keeps the cut area exposed to fresh air, encouraging healthy mushroom growth from the side of the block.
2. Mist: Lightly mist the cut area 2–3 times daily and keep humidity high.Stop misting when the baby mushrooms tarts to come out. Constant misting is better than heavy misting.
3. Harvest: Mushrooms appear within 1–2 weeks. Harvest when caps are flat by gently twisting at the base.
Flushes: Expect 2–3 flushes. After each harvest, remove all remaining fruit bodies, allow the block to rest for 3–4 days, then soak it in cold water for 2–3 hours before resuming misting to promote new growth
Common Mistakes to Avoid
High Temperatures: Going above 18 °C can slow growth and discolor caps.
Low Humidity: Results in dry, split caps.
Poor Air Exchange: Causes long stems and small caps.
Strong Light: Direct sun can dry the block and disrupt pinning.
💡 Tip: Keep the environment cool, humid, and ventilated to preserve those snow-white clusters and tasty texture.
What to do if pins form inside the bag
Don’t worry. Just ignore the internal pins. Gently fold the top of the bag to push out excess air, cut a small “X” in the side of the bag (where you want the mushrooms to grow), and begin misting that spot daily. Mushrooms will start fruiting from that cut. The internal pins will eventually be aborted naturally, as they don’t have space to grow.
Checkout out our fine Misting Spray Bottle to produce tiny droplets and keep humidity high. The size of droplets formed can easily be evaporated , this constant evaporation signals mycelium to pin.
Want to Learn More?
This kit introduces you to Stage 3: Fruiting, the final step in mushroom growing.
To explore all three stages (including how mushrooms grow from spores to harvest), check out our
Educational Mushroom Growing Kit.
Checkout all the Mushroom Growing kits Available in Our Spray and grow 3 Kg range.
Could not fruit the bag, or was it contaminated? Send us a photo or call us, and we will help you resolve the issue.